You're viewing docs for an older version of Lit. Click here for the latest version.
Creating directives
Directives are functions that can customize how lit-html renders values. Template authors can use directives in their templates like other functions:
html`<div>
${fancyDirective('some text')}
</div>`
However, instead of returning a value to render, the directive controls what gets rendered to its location in the DOM.
Internally, lit-html uses the Part interface to represent the dynamic DOM associated with a binding. A directive has access to the Part associated with its binding. For example, it can find the current value of the part and set a new value for the part.
To create a directive, pass a factory function to lit-html's directive function:
The factory function can take optional arguments for configuration and values to be passed in by the template author.
The returned function is called each time the part is rendered. The part argument is a Part object with an API for directly managing the dynamic DOM associated with expressions. Each type of binding has its own specific Part object:
commit. Writes the pending value to the DOM. In most cases this happens automatically—this method is only required for advanced use cases, like asynchronous directives. See Asynchronous directives for more information.
Here's an example of a directive that takes a function, and evaluates it in a try/catch block to implement exception-safe expressions:
constsafe=directive((f)=>(part)=>{
try{
part.setValue(f());
}catch(e){
console.error(e);
}
});
Now the safe directive can be used to wrap a function:
letdata;
// Don't throw an exception if data.foo doesn't exist.
Some directives are only useful in one context, such as an attribute binding or a content binding. If placed in the wrong context, the directive should throw an appropriate error.
This example shows a directive that should only work in a content binding (that is, a NodePart).
constmyListDirective=directive((items)=>(part)=>{
if(!(partinstanceofNodePart)){
thrownewError('myListDirective can only be used in content bindings');
Directives are invoked during the render process. The previous example directives are synchronous: they call setValue on their parts before returning, so their results are written to the DOM during the render call.
Sometimes, you want a directive to be able to update the DOM asynchronously—for example, if it depends on an asynchronous event like a network request.
When a directive sets a value asynchronously, it needs to call the part's commit method to write the updated value to the DOM.
Here's a trivial example of an asynchronous directive:
If your directive needs to maintain state between renders, you can rely on the fact that the Part object representing a given location in the DOM stays the same between calls to render. In the renderCounter example, the part's value serves as the state.
If you need to store more complicated state, you can can use a WeakMap, using the Part as a key.
import{directive}from'lit-html';
// Define the map at module level
conststateMap=newWeakMap();
conststatefulDirective=directive(()=>(part)=>{
letmyState=stateMap.get(part);
if(myState===undefined){
// Initialize state for this location
myState={};
stateMap.set(part,myState);
}
// ... use the state somehow
});
Why a WeakMap? Using a weak map ensures that the Part objects and state data can be garbage collected when they're no longer in use, preventing a memory leak. For more information, see the MDN page on WeakMap.
Sometimes you want a directive to manage multiple nested parts. For example, a directive that renders a list of items (like repeat) might create a nested part for each item. Keeping separate parts lets you manipulate them efficiently: for example, you can change the value of a single part without re-rendering the entire list.
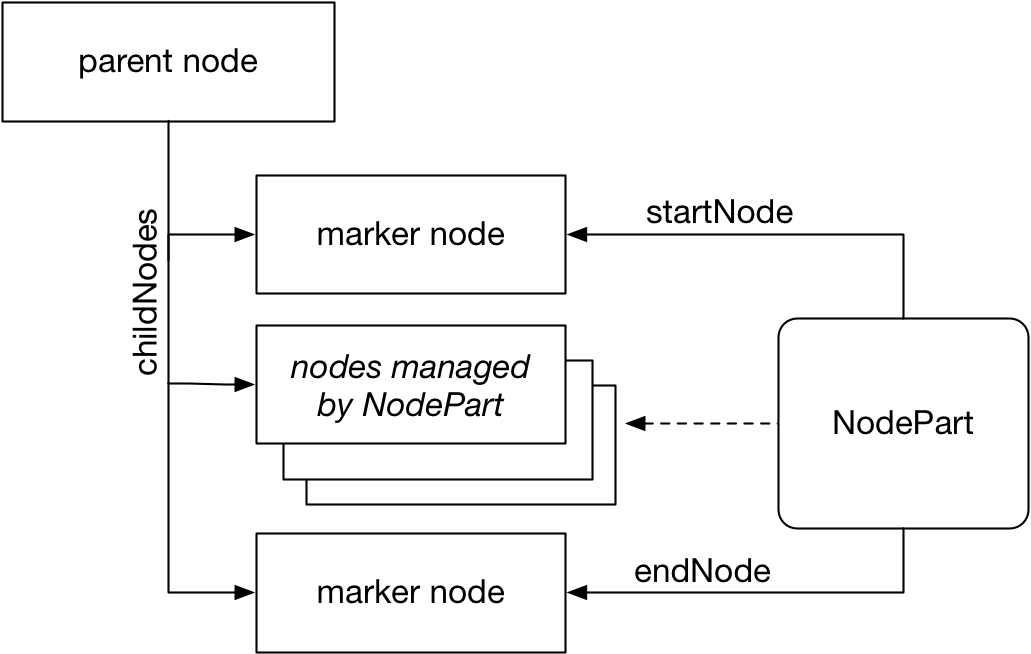
To create nested parts, you construct NodePart instances and associate them with specific locations in the DOM. The section of DOM controlled by a given NodePart needs to be delimited by static nodes that serve as markers. (lit-html usually uses comment nodes for these markers.)
As shown in the diagram, the nodes managed by the NodePart appear between its startNode and endNode. The following code creates and adds a new, nested part inside an existing part (the "container part").
import{NodePart}from'lit-html';
constnewPart=newNodePart(containerPart.options);
newPart.appendIntoPart(containerPart);
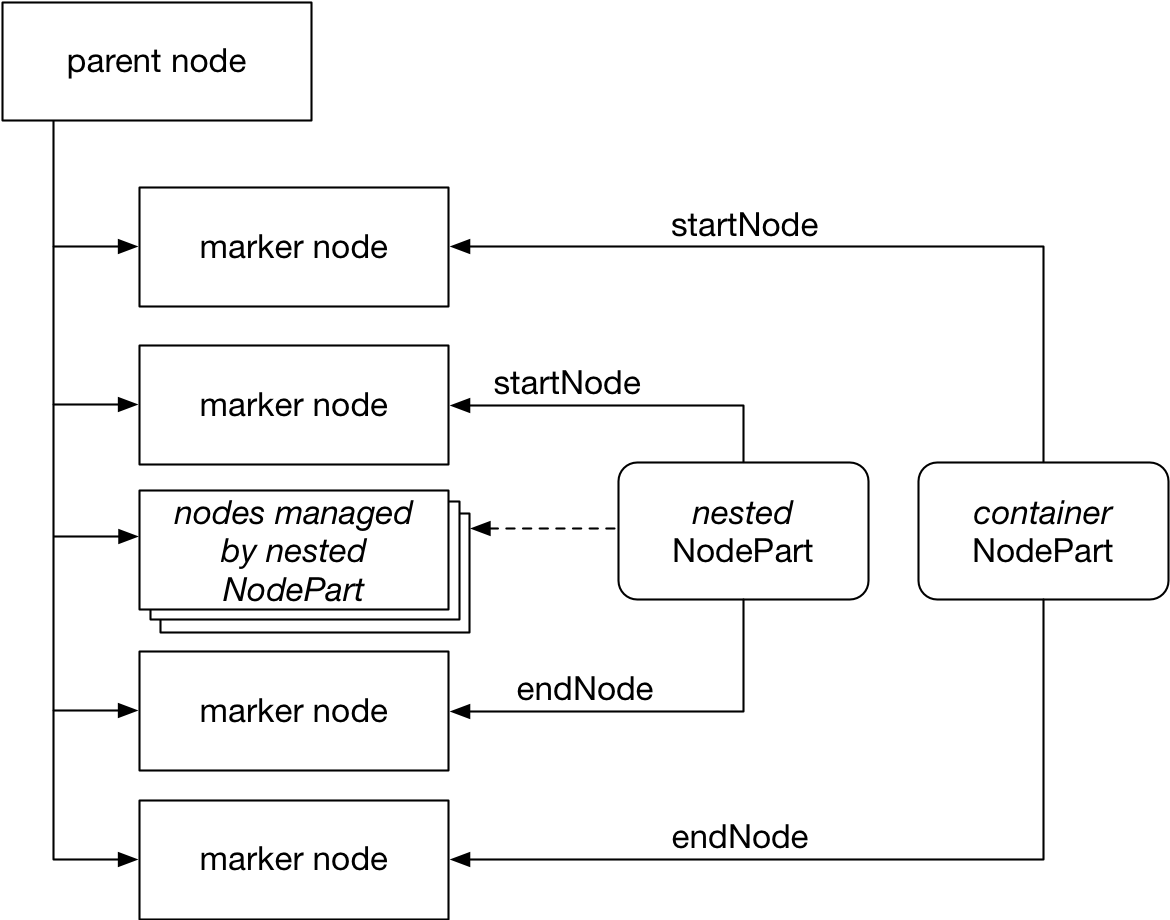
The end result looks something like this:
The appendIntoPart method creates the marker nodes and inserts the nested part for you. In some cases, you may need to manually manage the marker nodes (for example, if you're inserting a nested part into the middle of the child list). In this case, you can use code like this:
import{NodePart,createMarker}from'lit-html';
// Create a new part, passing in the render options from the original part
constnewPart=newNodePart(containerPart.options);
// Create markers surrounding content managed by the new part
Putting it all together—the following example directive takes a value and inserts it into the DOM twice by creating two nested parts. As shown in Maintaining state between renders, it uses a WeakMap to store these nested parts.
// for imperatively created parts, need to call commit()
// after setValue()
part1.setValue(value);
part1.commit();
part2.setValue(value);
part2.commit();
}
});
The NodePart class provides a number of other convenience methods, including other methods for adding nested parts, and a clear method to remove all of the DOM associated with a part. See the NodePart API docs for details.